Showing posts with label Decorating. Show all posts

Monday, March 10, 2014

Stylin' With Kleenex??


This post was graciously sponsored by Kleenex, but all opinions are my own. 
For more information, see my disclosure policy. 

Hi! It's Jilly. Man, I am ready for this cold weather to be GONE and for Spring to arrive! It feels like my nose is running all the time, especially when walking to my classes at school. I'm reaching for the Kleenex all. the. time.

When I went to one of my classes, after walking all the way from my car in the cold, this girl said to me, "You need to blow your nose. If you don't blow your nose you'll get a cold." Uhm...I'm pretty sure that's not how it works. Never heard that one! I do know that a runny nose is annoying, though. 

I have to make sure I keep a pack of Kleenex in my bag all the time! I really like these Kleenex Slim Packs. They don't take up a lot of room in your bag, and they keep the tissues neat and clean. 

Love these fun Kleenex Slim Packs! Perfect for tossing in your purse or backpack! #KleenexStyle


 Plus, they come in such fun colors! 

Lovin' the fun styles and colors of Kleenex Slim Packs. Perfect for tossing in a purse or backpack! #KleenexStyle


Kleenex even has a brand spankin' new Kleenex Style Finder, where you can take a little quiz and see which of their designs matches your personality and decor the best. I love taking online quizzes! Kleenex put together this whole "Style Studio" to celebrate their 90th Anniversary. 90 years! Whoa!

I also like to keep some Kleenex in the bathroom. I liked the design on this box. I thought it was nice and "Spring"y. I nestled the Kleenex inside a long wooden tray, then added a jar of q-tips and cotton balls, and a little bottle of lotion. It makes the boring old bathroom look much cuter!

The new Kleenex box designs match my bathroom perfectly! #KleenexStyle

So, head over to Kleenex's website and find your #KleenexStyle!

Friday, November 15, 2013

Halloween to Thanksgiving Decor Switch-A-Roo and FREE Thanksgiving Printable

Hi! It's Jilly. Thanksgiving is sneaking up on us fast. It will be here before we know it! I love decorating for Halloween, but I also like decorating for Thanksgiving. So, what I do when I decorate for Halloween is use a lot of "fall" looking things, like pumpkins and fall leaves, then sprinkle in a few spooky things, like black cats and skeletons. Thanks for the foot bone models, podiatrist hubby!

Halloween to Thanksgiving Decor Switch-A-Roo and a FREE printable! From Hi! It's Jilly

After Halloween I take down the spooky stuff and add in a few "Thanksgiving"ish things.

Monday, July 8, 2013

Tomato Can Turned Vintage Utensil Crock

Hi! It's Jilly. In the tiny kitchen in our apartment we don't have a lot of storage space. I was having a hard time fitting all my utensils in one drawer without having to fight the drawer every time. You know how it goes...the spatulas get stuck so you have to stick your fingers in there and try to push everything down just right to get the drawer to open!

I wanted a utensil crock, but all the ones I could find at the store were at least $15. But, I had a tomato can with this cool vintage label and thought it would be a really fun place to store my whisks, spatulas, and spoons!

Turn your old tin can into a utensil crock! | Hi! It's Jilly


I went over the label with a couple of smooth, thin coats of mod podge to give it a little extra protection, since it sits right next to the stove.

I love how it looks on my counter. I think it is so cute! For you East Coast folks, I got the can of tomatoes from Pricerite. All the labels on the Tuttorosso brand foods are vintagey looking. So fetch. Stop trying to make "fetch" happen! 

Tin Can Utensil Crock | Hi! It's Jilly


**Like this post? Then please share it on Facebook, Google+, or "pin" it on Pinterest.**
 
Are you following me on FacebookGoogle+PinterestTwitterInstagram, or Bloglovin' yet?!
If not, you totally should! :)


Monday, July 1, 2013

Patriotic Wooden Block Flag Tutorial

Hi! It's Jilly. I felt my Fourth decor was a little lacking, so I dreamt up this little flag block.

Patriotic Wooden Flag Block | Hi! It's Jilly

After I started working on it I realized I'd gone about it all wrong! So, I will tell you what I should have done!

1. Sand your block of wood.

2. Paint your block of wood white. (I put the stripes of painter's tape on it first, then painted. Ooops...)

3. After the paint is dry, tape off a square in the upper left corner and stripes on the rest of the block.

4. Paint the stripes red. After the red paint dries, remove the tape from the upper left corner, then tape over the stripes so you don't get blue paint on your red and white stripes. Paint the upper left corner blue.

Patriotic Wooden Flag Block | Hi! It's Jilly

Because I didn't do these last two steps right I ended up having my daughter paint the red stripes freehand, so they look a little wonky...I mean, homemade. ;)

5. After the blue paint dries, paint a single, white star in the upper left-hand corner. You could use a stencil, or draw a star with pencil, then paint over it. Or, better yet, cut a star out of painter's tape and place it in the upper left corner after you've painted the block white, but before you paint the corner blue. (Duh! Why didn't I think of that earlier?!)

I hope you can learn from my mistakes and make your own flag block way better than I did!

Patriotic Wooden Flag Block | Hi! It's Jilly

Here's my whole Fourth of July set-up in all its glory.

Fourth of July Decor with Wooden Flag Block Tutorial | Hi! It's Jilly

Some of you may recognize my Upcycled Tights Wreath. I just switched out the flower hair clip for this festive red, white, and blue one from my friend Kim at Bugaboo, Mini, Mr & Me

Fourth of July Decor with Wooden Flag Block Tutorial | Hi! It's Jilly

Have a happy, festive week!!

**Like this post? Then please share it on Facebook, Google+, or "pin" it on Pinterest. 
You can also follow me on FacebookGoogle+PinterestTwitterInstagram, or Bloglovin'.** 


Thursday, March 28, 2013

An Easy Easter-ish Sign/Plaque/Decoration Thingy

Hi! It's Jilly. I FINALLY got some Easter-ish decorations up. Just in time, right. Easter is, what, this Sunday?! Can I blame it on the fact that Easter came really early this year and we were gone for a week & a half? Cool, thanks.

I don't have a lot of Easter-specific decorations, but I really wanted to make some kind of sign that would remind us of the reason for the season, without being too over the top with bunnies or eggs or whatever.

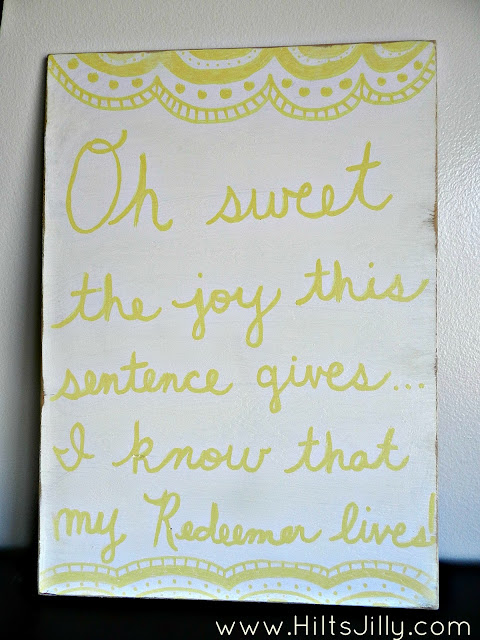
I had been pondering what phrase or scripture to put on my sign for a couple of weeks. Then, at church on Sunday a line from one of the hymns we were singing, "I Know That My Redeemer Lives", really jumped out at me. "It's perfect!", I thought. He lives. That's why we are celebrating!

Oh Sweet Easter sign Hi! It's Jilly


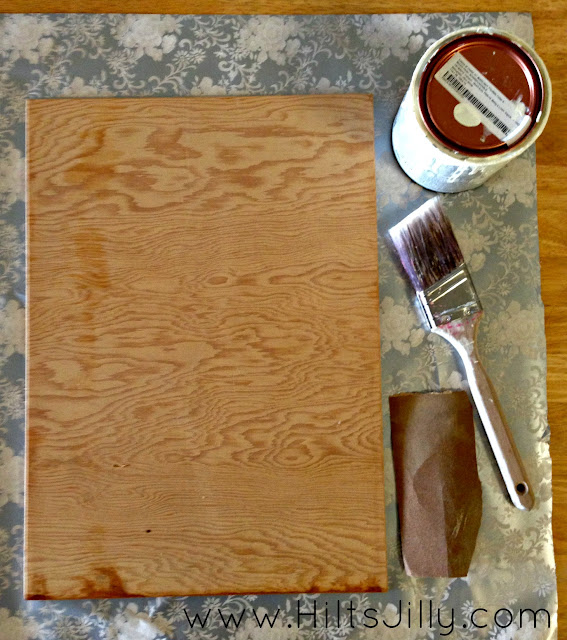
 To make the sign you'll need:
A thin piece of wood
Paint for your base coat
A paint marker
Sandpaper

Oh Sweet Easter sign materials Hi! It's Jilly


How I did it:

1. Sand the piece of wood to rough it up a little & help the paint adhere.

2. Paint the board with your base coat. I ended up doing two coats.

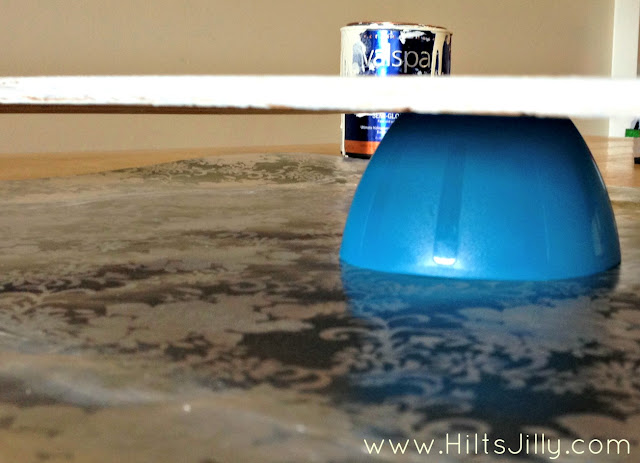
I set the board on top of an upside-down bowl so I could paint the edges and the board wouldn't stick to the table!

Oh Sweet Easter sign prop up Hi! It's Jilly

3. Write your phrase on the board using a paint marker. If you are afraid of messing up you can write it in pencil first, then go over it with the paint marker. I did 2 or 3 coats with the paint marker, since the yellow was so light.

4. Draw a scallop pattern along the top and bottom edges. I'm sure you could find a pattern to trace online if you don't want to do it free hand.

5. Sand the edges to give it that "worn" look. You're done!

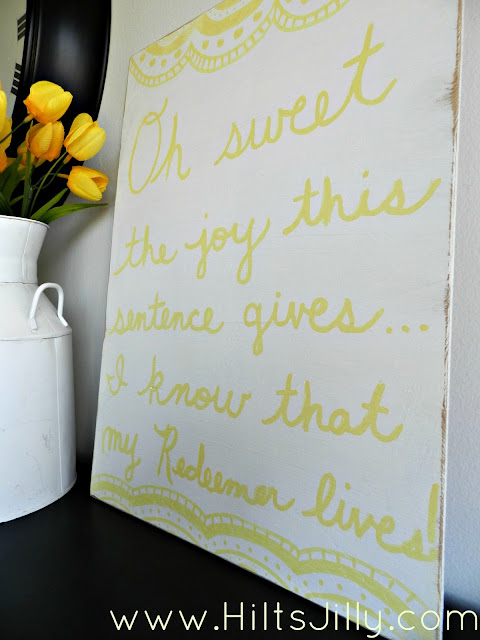
Oh Sweet Easter sign Hi! It's Jilly


I LOVE how this sign turned out! It's sweet and simple, yet the words are so meaningful.

Let me know if you try this project, and send me a picture of it when you're done!

Happy Easter, everyone!

Oh Sweet Easter Sign Hi! It's Jilly Easter display

Follow me on Facebook, Twitter or Pinterest so you don't miss anything!

Might be linking up with: Craft-O-ManiacC.R.A.F.TI Should Be Mopping The FloorMore the Merrier MondayMake the Scene Monday,Serendipity and SpiceHome Stories A to ZTitus 2 TuesdayTake It On TuesdayThe DIY Dreamer, House of Hepworths, Mom on Timeout, Pinterest Power PartyMy Favorite FindsWeekend WondersMy Turn For Us, Fancy This Friday, Sew Crafty Angel , Friday Favorites

Friday, November 16, 2012

Surprise Party!

Hi! It’s Jilly. Sorry I’ve been kind of MIA this week on the blog! Things have been CRAAAAAZY! A few reasons why:

#1- My seester is coming into town next Tuesday and staying for a week!! Woot! So, I’ve been trying to make a place for her to sleep besides my couch, as comfy as it is. ;)

#2- The kids and I are in a play – A Gilbert & Sullivan Christmas Carol – and it opens next Friday!

#3- I’ve been planning a SURPRISE birthday party for my sweet husband. Want to see my plans? I thought you might!

I have a board dedicated to the party on Pinterest, if you’d like to peruse that, but here’s the main “gist” of it. 

On Saturday night the hubs thinks we are going on a date, and that our friends who live one floor down are watching the kids. So, I am taking the kids “down to our friend’s house” and checking on the party (which I am setting up today in our building’s community room).

Then, after I come back upstairs for our “date” a different set of friends (who also live in the building) are going to call hubster and ask him if we want to join them downstairs to play ping pong. He’ll probably say, “Well, Jillian & I are headed out on a date”, then I’ll say, “Oh, we can pop in and play for a minute before we head out.” Then, when we get downstairs—SURPRISE!! Ha ha! It’s gonna be SO awesome!

For the food, I am making BBQ pulled pork sandwiches using THIS delicious-sounding recipe from Dine Like A Pauper. I was going to do pizza, but this will be just as easy, more yummy, and probably cheaper, since the pork shoulder is on sale right now.


I will also make BBQ baked beans (saute some onion, pour in a can of baked beans, add BBQ sauce to taste. Voila!), and have some chips and soda.

For dessert I’m going to make cupcakes. I will probably cheat and use a boxed mix for the cupcakes, but I HAVE to make cream cheese frosting, ‘cause it is his favorite. I’m planning to use THIS recipe from Beantown Baker  for the frosting.


Now, the decorations! I am going to make some of these cute “fireworks” from I Heart Naptime to hang from the ceiling over the buffet area, only I will make them green, which is Hubby’s favorite color.


I was planning to just make a birthday banner, but the kids had a great idea! I am going to cut out big letters spelling Happy Birthday, which the kids will decorate. Then, we will hang each letter from the ceiling with fishing line! Festive, eh? I’ll have to post a pic of how it turns out on Instagram. (Follow me so you don’t miss it!)

I found THIS awesome idea for a cupcake stand on Something From Cassie. SO easy, and simple to make work with any theme!


During the party we will have the adults play some Minute to Win It games, while the kids color, play, or watch a movie. (I don’t really care, as long as they stay out of our hair..ahem, I mean…I love kids!)


I think it’s going to be SO much fun, and he is going to be SO surprised! I hope it turns out like I plan, and all my wildest dreams come true. (Aack! I didn’t Vote for Pedro! Shoot!)

Monday, October 15, 2012

Decorating for Fall

Hi! It’s Jilly. Sometimes I feel like I’m always 2 or 3 steps behind. I got some fall decorations up a week or two ago, but I’m just now blogging about it!

halloween decorations

Why yes, I DO still have a wedding picture in that picture frame. Hey, I’m lucky to have Halloween decorations up at all, okay?!

halloween decorations2

One of my favorite parts is the “Boo!” pennant banner. A few years ago a few friends and I got together once a month to do a seasonal craft. We each brought all the supplies to do a simple, inexpensive craft. This banner was my contribution. Amazingly it has lasted all these years!

boo banner

I’m afraid you can’t see it very well, but the font I used was “Circus”. It adds a whimsical quality, but is still a little spooky! It’s pretty easy to figure out by looking at it, but if you’d like instructions to make the banner, just shoot me an email at hiitsjilly@gmail.com.

Hallowen decorations 3
I got that”R” pumpkin on clearance after Thanksgiving at Hobby Lobby for 90% off!! And, the vases were on clearance in the garden dept at Home Depot at the end of summer a couple years ago. You never know where you’re going to find great stuff!

Halloween decorations 4

I love the little black cat. You can put a tealight candle in it and the eyes glow! I love the pumpkin, too. Awesome clearance find at Joann’s one year.

DSCN3446

Yes, I went through and picked out all the red, yellow, brown, and orange Pretzel M&Ms. Ridiculous, I know. Hey! Looks like someone’s been eating those! It wasn’t me (this time).

Like the bone? I used some of Hubby’s old foot and leg models from school. Being married to a podiatrist isn’t all bad. ;)

Halloween decorations 5

I got the cauldron from Target last year. It came with some nasty, super sweet drink mix. But, because it had drink mix in it I was able to buy it with food stamps. Sweet!

Over the years while we were in med school I came up with some pretty  creative things to buy that were covered by food stamps because they had food attached. A salad dressing bottle, toys, movie tickets…Maybe I should tell you guys all about it sometime.

The creepy stuff coming out of the cauldron is…CORN SILK! K arranged it herself! Maybe I have a future decorator on my hands. Or, some other profession that involves draping corn silk on caldrons. Hmmm…

I hope you guys enjoyed a little slice of Fall at my house! Follow along on Facebook or Twitter to see more goodies from me!

Monday, April 16, 2012

Clothesline Photo Display

Hi! It's Jilly. At Christmas-time I strung some jute up in front of the niche in my kitchen slash living room to display my very thrown together advent calendar, which was just different activities written on pieces of red and green scrapbook paper. After Christmas I was too lazy was busy with other things and didn't take down the jute.

Then, Girl A was Star Student of the week and needed to take 10 photos to school. So, I dug out my printed pictures and found some she could use. While sitting at the table I glanced up at my sad-looking piece of jute and clothespins.

Then, I had an idea! Why don't I pin some of my pictures to the "clothesline"?! Instant photo display, and oh so cute! Plus, it is super duper easy to switch out the pictures. No frames to mess with!


Here is the {ridiculously easy} tutorial.
1. Use push pins to attach a piece of jute along the wall or across an opening, like a doorway or art niche. Jute is fairly inexpensive. I got this whole roll of it at Joann's forever ago and have used it for lots of projects.


2. Hang photos, momentos, quotes, or anything else you like, on the jute with clothespins.


3. Easy peasy!


I'm linking to THESE great parties!

LinkWithin

Related Posts Plugin for WordPress, Blogger...