Showing posts with label tutorial. Show all posts

Wednesday, September 24, 2014

DIY Harry Potter-ish Magic Wands

Hi! It's Jilly. My kids love Harry Potter. They love to read the books and watch the movies, and even had a Harry Potter birthday party this year. So, it was no surprise when they announced that this year's Halloween costume theme would be...Harry Potter. #shocked

For their birthday party I made wands for all the kids to take home, but I never got around to posting the tutorial for the wands! I know, I know...bad blogger. So, since Halloween is coming up and I will have a little Draco, Luna, and Hermione running around, I figured now was a great time to post the wand tutorial. 

The wands are super easy to make and look so awesome! Seriously.
DIY Harry Potter-ish Magic Wand Tutorial! These wands are soooo awesome and super easy to make! #harrypotter #tutorial #wand


Supplies:
Chopsticks
Hot glue
Brown spray paint
Cornstarch

Directions:
1) Using a hot glue gun, add lines and dots of hot glue to the chopsticks in whatever design you like. 
DIY Harry Potter-ish Magic Wands Tutorial!! They look soooo awesome and are super easy to make! #harrypotter #tutorial #wand
Be careful not to burn your fingers! I hear these things are pretty awesome for protecting your fingers, though. (affiliate link)

2) Spray paint the wands and allow them to dry. I poked holes in a box and put the wands in the holes so I could get the best coverage while painting.
DIY Harry Potter-ish Magic Wands Tutorial. Super easy and cheap! They looks awsesome, too! #harrypotter #tutorial #wands
The wands took 2-3 days to dry. 
These DIY Harry Potter-ish Magic Wands look soooo awesome and easy to make! #harrypotter #wand #tutorial

3) The wand still felt a little tacky because of the hot glue pieces on them, so my Hubby had the brilliant idea to dust them with a little cornstarch. It took away the tackiness, and it made the little details on the wands pop!

That's it! All the kids at the party loved their wands and how they were all so different. And, they were super cheap and easy to make...my favorite kind of craft! 

What do your  kids want to be for Halloween? Are you guys Harry Potter fans?

More Harry Potter stuff:
Harry Potter Hogwarts Party. SO fun! Lots of great ideas! #harrypotter #party #hogwarts 'Wizard Wanted Poster" Harry Potter Party Photo Booth Prop. So funny! #harrypotter #party #wizard #photobooth Harry Potter Hogwarts Party Invitations! #harrypotter #hp #hogwarts #party Sorting Hat Tutorial. It looks so awesome! #harrypotter #sortinghat #tutorial 

Last year's Halloween costumes:
DIY Dread Pirate Roberts Costume for all you Princess Bride fans out there! From Hi! It's Jilly. #halloween #costume #theprincessbride DIY Princess Buttercup Costume from The Princess Bride from Hi! It's Jilly #costume #buttercup #princessbride #halloween DIY Inigo Montoya Costume from The Princess Bride at Hi! It's Jilly. #costume #halloween #princessbride

*Be sure to follow me on Facebook, Twitter, Instgram or Pinterest so you don't miss the next post!*

Thursday, July 3, 2014

Patriotic Felt Star Hair Clips

Hi! It's Jilly. We are excited for the Fourth of July tomorrow! The girls and I wanted to make some cute little hair clips for them to wear for the festivities.

Love these easy and festive Patriotic Fourth of July Felt Star Hair Clips! #fourthofjuly #hair #crafts #kids


These hair clips are SUPER easy to put together. They didn't take very much time at all, so you can still whip some of these out in time for the Fourth.

Patriotic Felt Star Hair Clips

Tuesday, June 17, 2014

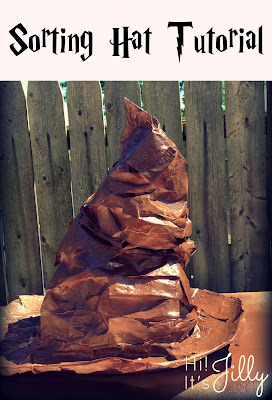
DIY Harry Potter Sorting Hat Tutorial

Hi! It's Jilly. At the kids' Harry Potter birthday party a couple weeks ago I wanted to sort all the kids into their Houses, but I didn't have a Sorting Hat. So, I looked at a few tutorials online and MADE one!
Sorting Hat Tutorial. It looks so awesome! #harrypotter #sortinghat #tutorial

Friday, January 10, 2014

Top 13 of 2013

Hi! It's Jilly. 2013 brought a lot of growth here at Hi! It's Jilly. It's been an amazing bloggy year! I'm so grateful for the great things that have happened and that a few of you read what I write. Ha ha!

I was a contributor at My Favorite Finds, as well as All She Cooks, which was a great experience and helped me "hone my craft".

I gained a lot of followers on Facebook, Twitter, Pinterest, and Instagram, which helped me meet some awesome new people and get to know all of you a little better.

And, I had a lot of popular posts during the year. I'm glad you guys liked them! In case you missed them, here's a list of the Top 13 Posts of 2013. It looks like you guys like to eat! ;)

Saturday, November 2, 2013

DIY Princess Buttercup Costume from The Princess Bride

Hi! It's Jilly. This year my kids decided to be characters from The Princess Bride for Halloween. I already shared with you Michael's Dread Pirate Roberts costume and Katelynn's Inigo Montoya costume. I know Halloween is technically over, but I couldn't pass up showing you Emma's Princess Buttercup costume! Just "pin" it for next year. ;)

DIY Princess Buttercup Costume from The Princess Bride from Hi! It's Jilly #costume #buttercup #princessbride #halloween

To make her costume I looked though the women's nightgowns, housecoats, and robes at the Salvation Army to find the perfect thing to craft into her Buttercup dress. Because Buttercup's dress has really flowy, droopy sleeves, I knew that a women's size dress would work.

Thursday, October 24, 2013

DIY Inigo Montoya Costume from The Princess Bride

Hi! It's Inigo Montoya Jilly. Last week I showed you Michael's Dread Pirate Roberts costume, which I am in love with. Now you get to see Katelynn's Inigo Montoya costume!

DIY Inigo Montoya Costume from The Princess Bride at Hi! It's Jilly. #costume #halloween #princessbride


This costume was super easy, too. What you need:

Thursday, October 17, 2013

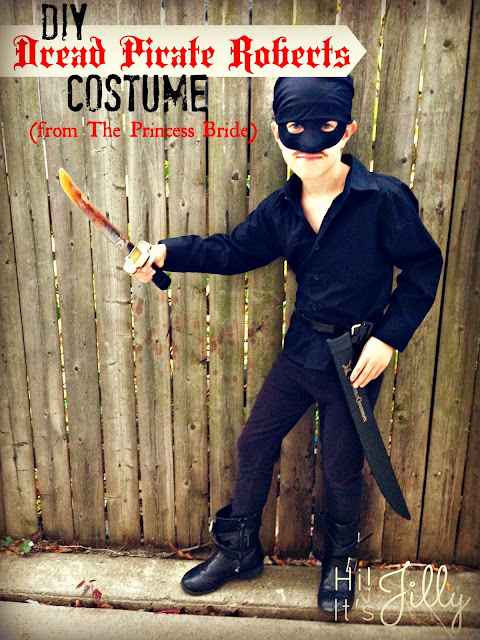
DIY Costume: The Dread Pirate Roberts from The Princess Bride

Hi! It's Jilly. Lately my kids have been OBSESSED with The Princess Bride. Like, crazy obsessed. So, they decided to all be characters from the movie for Halloween.

Michael is going to be Westley, aka the Dread Pirate Roberts. He's been pestering me for at least two weeks about putting together his costume. As you wish. ;)

DIY Dread Pirate Roberts Costume for all you Princess Bride fans out there! From Hi! It's Jilly. #halloween #costume #theprincessbride


His costume was SO stinkin' easy to put together! Definitely a great costume choice!

What You Need:
A black dress shirt. Any long sleeved, collared shirt will do.
Black pants or leggings. Michael is wearing a pair of the girls' black leggings. (Shh...don't tell.)
Black boots. Are you sensing a theme here?
A black bandana, or a piece of black fabric. A "doo-rag" would work, too.
A black eye mask. I got mine from Joann's for, like, one or two dollars.
A black belt. (Not the karate kind, silly) Michael is wearing one of my skinny belts. Ha!
A sword. One with a sheath/scabbard is preferrable.
A fake mustache, or some brown or black eyeliner to draw one on.

An easy DIY Dread Pirate Roberts Costume for all you Princess Bride fans out there! From Hi! It's Jilly. #halloween #costume #theprincessbride


I'm not going to do a "tutorial", 'cause it's pretty self-explanatory. All these things can be found either in your closet, at the thrift shop, at a craft store, the dollar store, or can be borrowed from a friend. I love swapping accessories with friends at Halloween!

An easy DIY Dread Pirate Roberts Costume for all you Princess Bride fans out there! From Hi! It's Jilly. #halloween #costume #theprincessbride


There you have it, folks. One Dread Pirate Roberts, ready to sail the high seas, fight off ROUS's in the Fire Swamp, and save Princess Buttercup!

And now...more pictures! Aah! I love 'em!

An easy DIY Dread Pirate Roberts Costume for all you Princess Bride fans out there! From Hi! It's Jilly. #halloween #costume #theprincessbride


"Mom, remember that time when his sword got stuck in the ground and he picked it up like this?"

An easy DIY Dread Pirate Roberts Costume for all you Princess Bride fans out there! From Hi! It's Jilly. #halloween #costume #theprincessbride


Seriously the cutest Dread Pirate Roberts ever! Sorry, Cary Elwes.

An easy DIY Dread Pirate Roberts Costume for all you Princess Bride fans out there! From Hi! It's Jilly. #halloween #costume #theprincessbride

What are YOU going to be for Halloween? 


Are you following me on Facebook or Twitter yet? Well, you should. It'll be awesome!

Visit thecsiproject.com

Friday, October 11, 2013

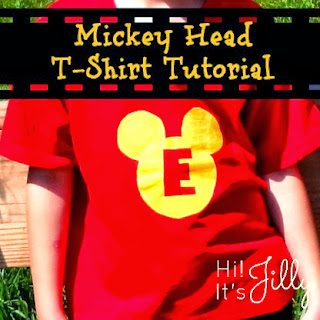
Personalized Mickey Head T-Shirt Tutorial

Hi! It’s Jilly! A looong while ago I did a guest post at Debbie Does Creations about some Personalized Mickey Head Freezer Paper Stencil shirts I made for our family trip to Disneyland.

A week or two ago I got the awesomest comment on my Facebook page from a girl named Melissa who used my tutorial to make shirts for her family's Disney cruise!

Personalized Mickey Head Shirts from Hi! It's Jilly

Her comment totally made my day! It was so neat to see a project someone made from one of my tutorials! And her shirts turned out SO great! I love how she outlined the ears and letters in white. So clever!Melissa asked if I could please post my tutorial here for all of you. But, of course! (said in a French accent)

Personalized Mickey Head T-Shirt Tutorial from Hi! It's Jilly. Great for those Disney vacations, and SO easy to make!


Here is the original post:

This summer we were able to go to Disneyland with my husband’s parents AND my Mom- Eight people total. It was quite the group, but SO much fun!

I wanted some fun, personalized shirts for us to wear one of the days of our trip. I started looking for different ideas online and saw a lot of great ideas. I finally settled on a
design and decided to do a freezer paper stencil.

I used the free font Mickey Ears, which was so cute and easy. To make the template I just typed the first letter of each person’s name in a Word document, and increased the font size until it filled one whole page.

making freezer paper template. Personalized Mickey Head Shirts from Hi! It's Jilly

Then I printed it out, laid freezer paper over it, and traced around it with a pencil. You want to write on the non-shiny side, because the shiny side is the side that you will be ironing to your shirt.

tracing on freezer paper. Personalized Mickey Head Shirts from Hi! It's Jilly

Next, cut out your template with an x-acto knife.

cutting out freezer paper stencil. Personalized Mickey Head Shirts from Hi! It's Jilly

You want to be sure you have enough paper left around the outside of your design so that it doesn’t cause problems when you are trying to paint and when you eventually peel the stencil off your shirt.

freezer paper stencil. Personalized Mickey Head Shirts from Hi! It's Jilly

Once you have your stencil made, iron the freezer paper to your shirt, shiny side down.

ironing on freezer paper stencil. Personalized Mickey Head Shirts from Hi! It's Jilly

After the shirt cools a little bit, start painting! The kids can even help with this step. You can get fabric paint in a huge variety of colors from your local craft store. Don’t forget to use your coupon and get 40% off!

Oh! And make sure you put a piece of cardboard or a paper bag inside the shirt between the front & back of the shirt. You don’t want to accidently paint the front & back together!!

painting a shirt. Personalized Mickey Head Shirts from Hi! It's Jilly

Now, let the paint dry COMPLETELY!

letting fabric paint dry. Personalized Mickey Head Shirts from Hi! It's Jilly

Once dry, CAREFULLY peel the freezer paper off of the shirt.

Personalized Mickey Head Shirt Tutorial from Hi! It's Jilly
(In this picture the bigger part of the stencil has been peeled off, but not the letter in the middle)

And that’s it!! Now you have a one-of-a-kind shirt to wear!!

Personalized Mickey Head Shirts from Hi! It's Jilly

If you’d like to get to know me and my crazy crew better, follow me at Hi! It’s Jilly, on Facebook, Pinterest, or Twitter. See you soon! :)

Here are some other easy crafts that might be right up your alley.


Tin Can Utensil Crock | Hi! It's Jilly

DIY Doodle Book with FREE Printables. Your kids will love them!

Friday, October 4, 2013

Framed Burlap Pumpkin Tutorial and Fun Fall Decor

Hi! It's Jilly. I FINALLY got my Fall decor up! Yay! I wanted to make this fun little framed burlap pumpin to go along with my fall decorations this year. It was SO easy. Seriously. You can make this!

Framed Burlap Pumpkin Tutorial and Fun Fall Home Decor from Hi! It's Jilly

Let's gather our supplies.


Supplies:
Laminated Burlap Sheets
Picture Frame (I got mine at Dollar Tree)
A pumpkin cookie cutter OR a pumpkin stencil
White paint
paint brush
scissors
pencil

1) Cut a piece of burlap the size of your picture frame. At Wal-Mart I found these sheets of laminated burlap. They are all ready to be painted on, or you can stick them in your printer and print directly on them! I thought that was pretty awesome! You could probably use "normal" burlap, but it might soak up a lot more of the paint.

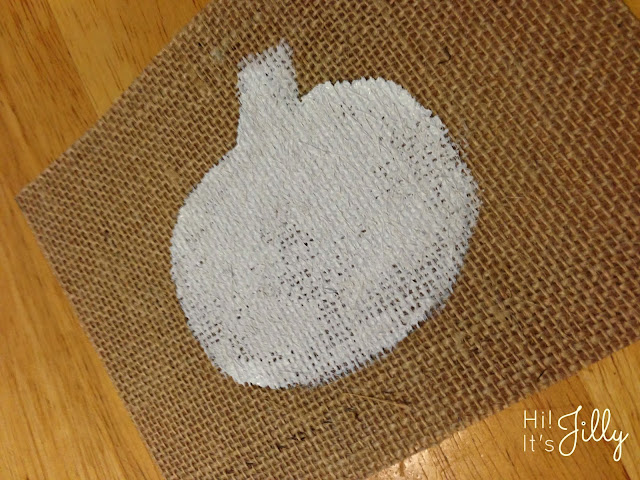
2) Trace your pumpkin shape on to the piece of burlap.

Framed Burlap Pumpkin Tutorial and Fun Fall Home Decor from Hi! It's Jilly

3) Paint inside your pumpkin shape, then let it dry.

Framed Burlap Pumpkin Tutorial and Fun Fall Home Decor from Hi! It's Jilly

4) Put your burlap pumpkin in the picture frame without the glass insert.

5) All done! See, I told you it was easy!

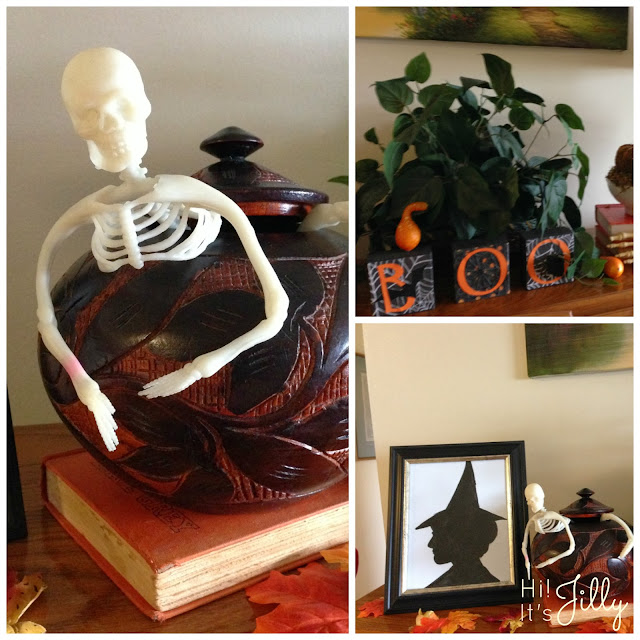
Let's take a peek at the Fall decorations all put together. Aah! I love it. It feels so homey!

Framed Burlap Pumpkin Tutorial and Fun Fall Decor from Hi! It's Jilly

Framed Burlap Pumpkin Tutorial and Fun Fall Home Decor from Hi! It's Jilly


Here's the top of the piano. Michael suggested the skeleton crawling out of the pot. Ha ha!


Framed Burlap Pumpkin Tutorial and Fun Fall Decor from Hi! It's JillyFramed Burlap Pumpkin Tutorial and Fun Fall Decor from Hi! It's Jilly

Do you like decorating for Fall? Done any fun Fall projects or made any yummy Fall recipes? Then be sure to link up with my Fall In Love With Fall link party, open until October 15th. 

And, follow me on Facebook, Twitter, Pinterest, or Instagram to see what crazy thing I post next!

Love to link up with THESE great parties.

Visit thecsiproject.com

Tuesday, September 17, 2013

Huge Craftsy Sale!

Hi! It's Jilly. Have you ever heard of Craftsy?! It's this cool website where you can take crafty classes online, like cooking, sewing, cake decorating, knitting, art...so many selections! It's cool because you can do the classes at your own speed, and can access them from any device with internet. You can watch them as many times as you want for as long as you like! Perfect for Moms who might have to stop and clean up a mess or two. ;)


They also have a big 'ole selection of fabric and yarn available to purchase. AND, there's a great community of like-minded crafters you can connect with.

Craftsy

Right now they are having a HUGE SALE-- up to 75% off all courses, fabric, and yarn. Wowzers! It's the perfect time to try out one of their classes or snatch up some supplies for that Christmas crafting! (Yes, I said it "C" word and it's only September. Gotta think ahead!)

Join Craftsy for FREE now and check out all their awesome stuff!

Bloggers: If you are interested in Craftsy you should sign up as an affiliate! They give you a free class to try AND a little somethin' somethin' whenever someone signs up for a class, joins Craftsy, or becomes an affiliate because of you. I'm just sayin'...it's something to think about worth signing up for!

Friday, September 13, 2013

The Paper Lunch Bag Wreath from Kim at Bugaboo, Mini, Mr, and Me.

Hi! It's Jilly. Our contributor today is a friend of mine from High School! Now we're all grown up and have blogs of our own! Well, "grown up" is all relative, right?! I can't wait for you to meet Kim and see the cute wreath she's whipped up for us!

Hi!  I'm Kimberly - the "me" over at bugaboo, mini, mr and me.  My blog is a peek into all my creative endeavors - successes and failures! - and includes a little of everything: creating with kids, lots of different crafts, sewing, baking and cooking, some DIY/power tool type stuff, a little photography, and writing.  I'm really excited to be here guest posting - and especially excited for the theme because it gave me a chance to make a little door decor, which I haven't done in a long time.

I used to think that making wreaths was something old ladies did with plastic flowers and weird wicker baskets and such.  I had zero interest in that type of "crafting."  Once I started my blog and was looking for new ways to be unique and creative with my crafting, I realized you can make a wreath out of just about anything... And they've been some of my favorite creations ever since!

Today, I'm going to show you how to make:

The Paper Lunch Bag Wreath from Kim at Bugaboo, Mini, Mr, and Me. Part of the Fall In Love With Fall Series at Hi! It's Jilly

Which, ironically, includes some fake floral stuff.  Ha!

The Paper Lunch Bag Wreath from Kim at Bugaboo, Mini, Mr, and Me. Part of the Fall In Love With Fall Series at Hi! It's Jilly

So, let's get started!  Gather all your supplies!  You can make the basic Paper Lunch Bag Wreath with the items below:

The Paper Lunch Bag Wreath from Kim at Bugaboo, Mini, Mr, and Me. Part of the Fall In Love With Fall Series at Hi! It's Jilly

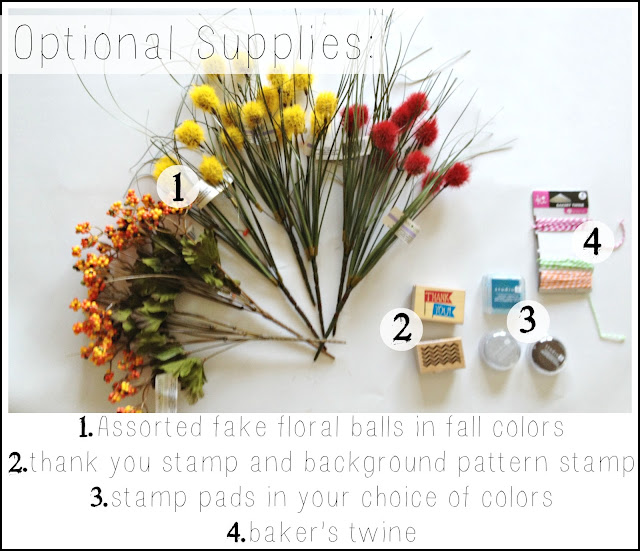
And you can make the "supreme" version (the one pictured) with the additional optional supplies:

The Paper Lunch Bag Wreath from Kim at Bugaboo, Mini, Mr, and Me. Part of the Fall In Love With Fall Series at Hi! It's Jilly


A note about supplies.  One thing I try hard to do is keep my crafting affordable.  We're all on a budget right?  So my number one tip for wreaths is to check out your local thrift stores for wreath forms.  My local store usually has styrofoam and straw wreath forms regularly and they are $0.75!!  Which is awesome compared to like $12 at Michael's.  

For this specific wreath, my form is a 10 inch squared edge form (but you can totally use any kind of foam form) that I got at the thrift store.  I got "giant" paper lunch bags at Walmart for just over a dollar for a 300 pack (they are slightly larger than normal lunch bags).  I found the crepe paper leaves at the dollar store.  They came in packs according to color, so if you want a multi-colored wreath like the one pictured, you'll have to get more than one pack.  I got four, each pack has 10 leaves.  I have a ton left over for a different craft now!  The floral ball shaped thingies are from the dollar store as well.  The stamps came from JoAnn's in their $0.99 bins, and the mini stamp pads and the twine came from Walmart in their $1.00 craft bins.  SO.  There's your shopping list, in case you needed some ideas...


Prepare your bags:


The Paper Lunch Bag Wreath from Kim at Bugaboo, Mini, Mr, and Me. Part of the Fall In Love With Fall Series at Hi! It's Jilly
1.  Keeping the bag flat, use your scissors to cut across the top (where it's all jaggedy) and to cut the bottom off.

2.  Slice the bag open down the middle seam on the back.

3.  If you opened it up now, it would look like this.

4.  Fold it all up on the folds and then fold it in half.

5.  Cut it in three (somewhat) equal pieces.

6.  Take each piece, open them up and then crumple them.


I needed three bags to cover my wreath form (9 strips), you may need a few more or less depending on the size of your form and how crumply you keep your strips when applying them.


Wrap the wreath:


The Paper Lunch Bag Wreath from Kim at Bugaboo, Mini, Mr, and Me. Part of the Fall In Love With Fall Series at Hi! It's Jilly

1.  Begin with your naked wreath form.  Pick which side is the back and lay it backside up.
2.  Put some hot glue right on the form.
3.  Straighten out one of your paper bag strips slightly (leaving some of the folds and wrinkles as is) and smoosh it down into the hot glue.
4.  Wrap it around the front of the wreath, then tuck it under to the back.  When you are wrapping, make sure to overlap the paper a little and also keep it rumply. 
5.  When you run out of strip, add a line of hot glue along the end.
6.  Push the paper strip down onto the wreath form.
7.  Now, take a new strip and add a line of hot glue to one end.
8.  Smoosh it down onto the wreath, overlapping the end of the last strip.  Place it at a slight angle to help it lay flatter as you wrap.
9.  Wrap and wrap until you run out.
10.  Hot glue the end down.
11.  Continue adding strips with hot glue, overlapping, crumpling and sometimes twisting and smooshing a bit, until the form is completely wrapped.

Adding leaves:
The Paper Lunch Bag Wreath from Kim at Bugaboo, Mini, Mr, and Me. Part of the Fall In Love With Fall Series at Hi! It's Jilly

1.  Begin with your wrapped wreath form.  Again, you'll need to decide which is the front and which is the back.
2.  Pick a leaf to start, put a little hot glue on the back.
3.  Press it down onto the wreath, anywhere.  Hold it there for a moment.
4.  Voila!  A leaf!  Pull up the edges a bit.
5.  The best part about these leaves is that they have wires for veins.  So before you add them to the wreath, crumple them up a bit.  Bend them and shape the edges.  Most fall leaves aren't perfectly flat, are they?
6.  Plus, you can curl the stem, which looks cooler than a long straight lame stem.
7.  Put some hot glue on the back.
8.  And add it to the wreath right next to the previous leaf.
9.  You will want to overlap your leaves.  Place them at different angles and in different spots along the wreath.  Bend them into each other.  Continue adding them and filling in holes until the leaves cover a little less than half of the form.

And you could totally stop here!  This would make a perfectly pretty fall wreath for your door.  Just:

10. Tie a piece of twine in a loop.  Place the loop under the wreath form.
11.  Pull one end of the loop through the other end and tighten.  Add a dab of hot glue to keep it in place.

And then you can hang it!

But, you could also keep going.

Adding more pizazz:
The Paper Lunch Bag Wreath from Kim at Bugaboo, Mini, Mr, and Me. Part of the Fall In Love With Fall Series at Hi! It's Jilly
1.  Take the little plastic balls and pull them off of the large stem so they are single stemmed and smaller, but still in little bunches.
2.  Add hot glue along the stem.
3.  Poke it down under a leaf.
4.  I places mine at the intersections of leaves - where they overlapped - to hide the glue-y stems.
5.  I also made them more concentrated at the bottom of the wreath, and more sparse toward the top.

Again, you could stop here!  Another perfectly pretty wreath for your door!

BUT.  What about just a leeeeettle more?

Adding even more pizazz:

The Paper Lunch Bag Wreath from Kim at Bugaboo, Mini, Mr, and Me. Part of the Fall In Love With Fall Series at Hi! It's Jilly
1.  Cut your fuzzy ball flowers apart, leaving stems on each one.
2.  Separate them into three piles, one for each color, and then a third pile for a mix of the two colors.  Fan one of the piles out and shape it until you like it, place it on top of a scrap strip of paper bag, squirt hot glue on the stems and wrap the bag around the stems.  This will keep the flowers together how you want them and hide the stems.
3.  Trim the ends of the stems and attach the flowers to the bottom of the wreath (just barely overlapping the leaves) by hot gluing the paper wrapped part down.  Repeat steps 2 and 3 for the mixed color pile.
4.  Pull a few balls off of the last pile of flowers.  Then repeat steps 2 and 3 again.
5.  Once you've glued the paper wrapped stems down to the wreath, hot glue the single balls into any holes of empty spots.
6.  Cut a small section of scrap paper bag and glue it over the last stems sticking out to hide them.

And then you could stop.

But if you're like me, you don't know when to stop.  So why not shnazz it up some more?

Add a banner:
The Paper Lunch Bag Wreath from Kim at Bugaboo, Mini, Mr, and Me. Part of the Fall In Love With Fall Series at Hi! It's Jilly

1.  Cut a piece of twine to fit across the inside of the wreath, with a little extra wiggle room to glue.

2.  Fold a piece of scrap paper bag in half and cut out three triangles and a rectangle.

3.  Use your "background pattern stamp" and a neutral color stamp pad to stamp a background on the pieces.  Mine is brown chevron.

4.  You can use whatever kind of quote or phrase you want for the rectangle piece, I went with Thank You, for a Thanksgiving-y theme.  I used a bright contrasting turquoise so it would stand out.

5.  Open up your triangle, lay a line of hot glue down the middle.

6.  Lay your twine across the inside, making sure the paper piece is where it needs to be, 

7.  and smoosh the triangle closed around the twine.

8.  Repeat this for the other two triangles and the rectangle.

9.  Turn your wreath over and glue the ends of the twine down to the wreath.

10.  To hide the glue spots and make the twine extra secure, glue down a small square of paper bag over each end.

11.  Turn your wreath over.  Done!

And because there's likely no more trends you could possibly add at this point without making it seem completely over the top, you're finished!


The Paper Lunch Bag Wreath from Kim at Bugaboo, Mini, Mr, and Me. Part of the Fall In Love With Fall Series at Hi! It's Jilly


Just hang proudly on your front door and enjoy along with the nice cool fall weather!


The Paper Lunch Bag Wreath from Kim at Bugaboo, Mini, Mr, and Me. Part of the Fall In Love With Fall Series at Hi! It's Jilly


It's my favorite season - I think because of the colors.  I love that this wreath illustrates that.

You might also like some of my other fall-inspired wreaths!  Like: 


OR, my "flavors of fall - dessert edition" which includes recipes for five different yummy fall desserts!


Thanks for asking me over, Jillian!  Hope to see you all at my blog, or you can find me on facebook and pinterest!

Okay, how cute is that wreath?! Must. make. one. now. Thanks for the shopping tips, too. I never would have thought about getting wreaths from the thrift store!

To check out the rest of our Fall In Love With Fall Series, click that little button below. So you don't miss the rest of the series, follow me on FacebookTwitter, or Pinterest, or sign up for my newsletter and get each new post straight to your inbox!


Fall In Love With Fall Series full of great Fall projects & recipes on Hi! It's Jilly. #fall #series

LinkWithin

Related Posts Plugin for WordPress, Blogger...